Analysis of Cracking Causes and Repair Methods for Valve Pattern Shells
Blog post description.
heweifeng
11/11/20253 min read

Analysis of Cracking Causes and Repair Methods for Valve Pattern Shells
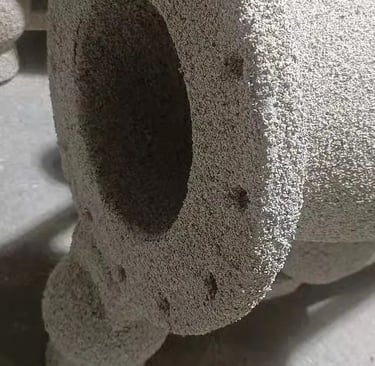
A friend posted two photos in a group chat, explaining that a valve component was coated up to the second layer, taken out for the third layer, and then placed in the drying room, where the flange cracked. They asked how to address this issue.
This is actually a common occurrence in winter—a shell-making defect caused by fluctuations in humidity and temperature. During winter, the air becomes significantly drier, especially in northern factories, where shell cracking frequently happens, particularly in the face coat. Why?
Most factories don’t use central air conditioning but rather standard systems. When winter arrives, indoor humidity drops sharply. For modules that have just been coated with the face layer, the moisture on the surface and the ambient humidity differ greatly. I once monitored the humidity in a shell-making workshop during winter—it stayed around 30%, rarely exceeding 35%. Sometimes, sprinkling water was used to increase humidity, but the effect was limited. The humidity would briefly rise before dropping back to around 30%.
Such conditions act like an accelerator for drying the face coat. Ideally, the first and second layers require a low-temperature, high-humidity environment. Since these layers are relatively thin—usually under 0.5mm for the face coat and under 1mm for the second layer—they need slow, uniform drying rather than rapid drying under large humidity differences. Under slow drying conditions, the slurry film contracts evenly without cracking. However, under rapid drying, although the slurry still shrinks, the intense contraction combined with resistance from the wax pattern can exceed the slurry film’s strength, leading to cracks.
Some might ask: why does the slurry crack in only one place and not multiple areas? This largely depends on the strength of the slurry and the drying conditions. Generally, once one crack forms, the overall contraction stress is released, preventing further cracking elsewhere.
In this case, the crack appearing near the flange is likely due to stress concentration in that area—a boundary between inner and outer sections. There might also be slight differences in shrinkage between the inner and outer slurry films, leading to cracking at this point. Additionally, I suspect a significant temperature difference between the face coat and the backup coat (here, the third layer) may also contribute to the shell cracking.
Usually, by the time we apply backup coats, the shell has gained some strength, and operators tend to relax a bit. Also, the drying strategy shifts to high temperature and low humidity for backup layers. Sometimes, the temperature difference between the face coat and backup coat exceeds 3°C. Don’t underestimate this 3°C—it could very well be the cause of the shell cracking.
Some may think such a small temperature fluctuation isn’t enough to crack the shell, but the reality might surprise you. Even moving an un-dewaxed module from the drying room to the dewaxing area can cause instant shell cracking.
I recall reading an article about controlling casting fins, where the author studied the impact of temperature fluctuations on fin defects. The study showed that when temperature variations exceed 3°C, fin defects increase significantly. Fin defects are essentially an indicator of shell cracking.
In summary, I believe there are two possible reasons for the valve shell cracking: first, the low humidity during the face coat stage caused overly rapid drying and cracking; second, the significant temperature difference between the face coat and backup coat led to wax pattern expansion, which in turn caused the shell to crack.
So, can this shell be repaired? Yes. For standard stainless steel products like this, the solution is to thoroughly clean the cracked area to prevent sand inclusion later. Then, reapply the coating starting from the face coat layer. Since the shell has already cracked and the stress has been released, other areas are unlikely to crack again. Once the repair reaches the same layer, you can proceed with the normal shell-building process.

